SnipWiz
The SnipWiz Plugin
The SnipWiz plugin was generously contributed by Frank Lichtner. It has two parts: a Snippet Wizard and a Template Class Wizard.
Snippet Wizard
This provides a way of inserting commonly-used code snippets direct into your code. Several are provided by default, but you can amend these and add others of your choice. You can insert a snippet into your code by right-clicking and choosing SnipWiz from the context menu.
There are two Placeholder symbols available:
$will be replaced by the selection, if any.@sets the position where you want the caret to be after the snippet has been inserted.
For example, one snippet is:
for ($ = 0; $ < @; $++)
Let's say you had selected the word counter This will expand to:
for (counter = 0; counter < |; counter++)
where the | symbol represents the caret position (imagine it blinking), in the right place for you to add the maximum-count figure.
The Edit Snippets dialog is accessed from Plugins → SnipWiz → Settings. On its left is a list of menu entries for known snippets.
On the right the selected entry is displayed, with the code it inserts. The Change and Remove buttons do the obvious things to the current selection.
To add a new item, amend the selection (both the menu item and the code), then click Add.
For example, to add a snippet that surrounds a string with wxT(" and "), amend one of the similar ones.
You might change the menu entry from: wxT(" to wxT("$") and the code from: wxT("@") to wxT("$") Click Add to add the new entry.
Now if you highlight the word foo in the editor, and select wxT("$") from the context menu, you should now see wxT("foo")
If you press the Ctrl key while clicking on the snippet menu, the snippet is not inserted at the current caret position,
but instead is copied to the clipboard and also to an internal buffer. You can do the insertion elsewhere, perhaps repeatedly, by pasting in the usual way (e.g. Ctrl+V),
or from that buffer (via the context menu). Note however that the original text selection is retained: selecting wxT("$") from the
context menu while Ctrl is being pressed and foo selected will copy wxT("foo") to the clipboard;
and so multiple pastes will insert multiple wxT("foo")s, irrespective of what is subsequently highlight.
Tip
If you have a multi-line snippet, you should paste from the internal buffer, since this will retain the correct indentation.
Template Class Wizard
Plugins → SnipWiz → Template class runs the Template Class dialog. This lets you create templates of classes to reuse.
For example, I often derive from wxDialog; here's a template that expedites this:
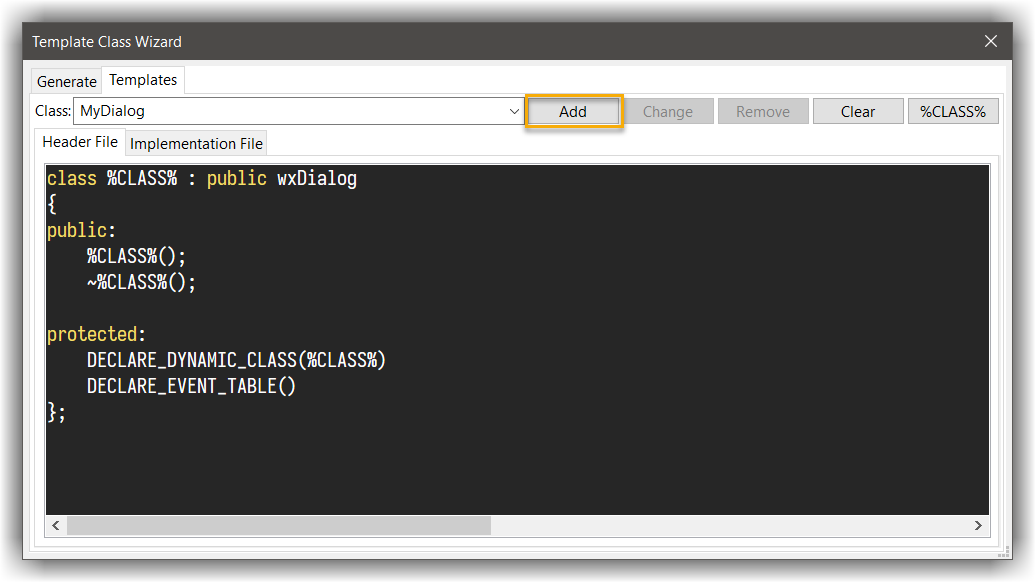
Create a new template for wxDialog subclasses
- Select the
Templatestab in the dialog and place the below content:
In the Header File tab:
class %CLASS% : public wxDialog
{
public:
    %CLASS%();
    ~%CLASS%();

protected:
    DECLARE_DYNAMIC_CLASS(%CLASS%)
    DECLARE_EVENT_TABLE()
};
While the Implementation File tab content is:
IMPLEMENT_DYNAMIC_CLASS(%CLASS%, wxDialog)

%CLASS%::%CLASS%()
{
}

%CLASS%::~%CLASS%()
{
}

BEGIN_EVENT_TABLE(%CLASS%, wxDialog)
END_EVENT_TABLE()
Info
The keyword %CLASS% stands for the class name. When the template is used, all occurrences of it will be replaced with the actual class name.
You should now have a dialog with the following content:
- Click Add - this will save your new template
Using the template
- Switch to the
Generatetab - Under the
Classsection select the template (in our caseMyDialog) - Give a name to your class (this will replace the
%CLASS%place holder) - Under the Files section, set the file name (header and implementation), path and (optionally) a project tree folder
- Click
Generate
You should now have 2 new files generated: header and implementation files with the class definition